Unfortunately I need to include a SAFETY MESSAGE and disclaimer: this paper discusses building an electrical device that operates using potentially deadly voltage and current. The Mercury Vapor lamp operates at a high temperature which can cause severe burns or cause fires. The lamp envelope is also under a high vacuum and can implode if mishandled. All Mercury Vapor lamps emit ultraviolet light, which will cause damage to human eyes. Appropriate UV resistant eyewear should be worn around these lamps.
This paper is written for information and research purposes only. The author will not be held responsible for any injury, damage, forest fires, emotional distress or misfortune of any kind suffered by or caused by anyone who chooses to build an actual apparatus using information contained in this paper. If one wishes to build a collecting light rig and has any doubts, the author recommends that person contact a qualified licensed electrician in their local area.
The cost of commercially available Mercury Vapor insect collecting lights is beyond the reach of many hobbyists. In fact an Internet search in February 2006 revealed that a single 175 Watt MV collecting light will cost between 200 and 275 US dollarsģ I nearly choked when I saw that. I for one certainly could not afford to pay $200 for a collecting light.ĀĀ Maybe I could afford it once, but then my wife would make me sleep out in the garage with itģ
Being an Electronics Technician by profession (and more or less broke), I knew for certain I could build a very useable MV light that was as safe and just as effective as the commercial units, for around 25% of the cost plus a little work and creativity. If one is able to scrounge or forage any of the parts, the cost can be even less.
I built my first rig about six years ago, and have made several improvements and simplifications since. I have shown a few ōnon electricalö type people how to build one and got very positive feedback on how easy and safe it really is.
Part of the beauty of building oneÆs own equipment is that it can be infinitely customized. I have built single 175W rigs, double rigs, MV rigs paired with 15W fluorescent BL tubes, MVs paired with 40W BL tubes, lamps with screw mounts for tripods, lamps with clamp mounts, lamps with hanger mounts, quick-disconnect wires, and the list goes on. The effectiveness and low cost of 175W MVs canÆt be denied, but if one wishes, one could just as easily build a 250W, 400W, or even 1000W MV rig. The cost would be significantly higher and the electrical work slightly more complicated.
In my opinion, MVs higher than 175W are effective, but can be somewhat uncomfortable to be around.
This paper will describe the construction of a single 175 Watt MV collecting light with a clamp mount lamp socket.
The most vital pieces of the rig of course are the Mercury Vapor lamp, mogul socket and ballast transformer. I donÆt know why itÆs called a ōmogulö but itÆs much bigger than a typical household (medium base) light socket and should be made of porcelain or ceramic.
In many areas of the US, one can go to the home improvement warehouse stores and buy what is usually labeled as ō175 Watt Outdoor Mercury Vapor Area Lightö for less than $25.
In the town nearest me, both LoweÆs and Home Depot carry these. The manufacturer I have seen most often is Regent. It even includes a clear lamp. What a bargain.
If you are lucky enough to forage for parts and can salvage the socket and ballast, only a clear lamp will be needed.
Mostly I have seen GE and Phillips brand lamps at the stores, for around $15. Because so much money will be saved compared to buying a commercial rig, I would recommend picking up an extra lamp. These may not be readily available in all areas.
If the local mega-depots donÆt have any, check feed stores and farm supply stores such as Tractor Supply, or whatever is in your area.
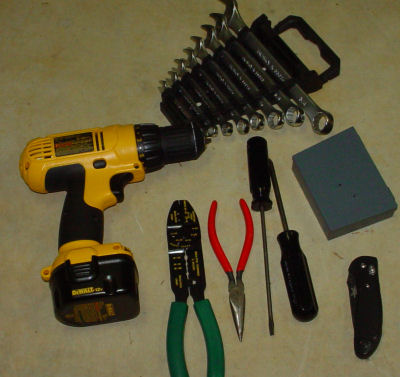
Tools needed include:
wire cutters
wire strippers
basic electrical crimpers
a drill and assorted bits
assorted screwdrivers
either a socket set, nutdrivers or wrenches; one could probably get by with an 8ö adjustable wrench
needlenose or regular pliers, or ōchannel lockö type pliers
perhaps a vise or a couple heavy duty pliers to reform the transformer bracket if needed.
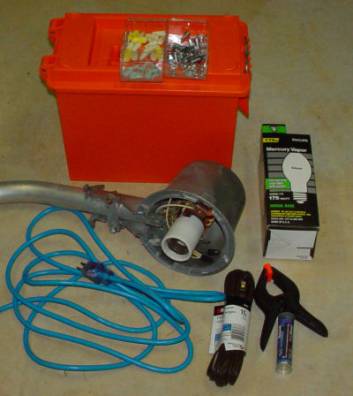
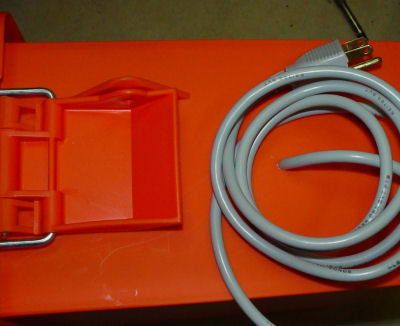
A short outdoor extension cord (typically the bright orange one you see all over the place), or an old power cord from a computer, etc.
A 12 or 15 foot medium duty ōindoorö extension cord (the kind with a flat two prong plug, you might have some of these laying around the homestead or maybe you can pilfer one from the Christmas decorations if your better half is not looking).
Some medium size wire nuts.
A few smallish machine screws (bolts) and nuts to fit, and I advise including some flat and lock washers or ōnylockö type nuts. Most folks have a box or drawer or garage full of theseģ if not perhaps they could be procured from a neighbor. If they must be purchased, I would recommend a pack of #10-32 x 1-1/2 or 2 inches (plus nuts and washers to fit.)
A few medium female spade connectors, or for a real professional job, a soldering iron and soldering supplies and heat shrink tubing.
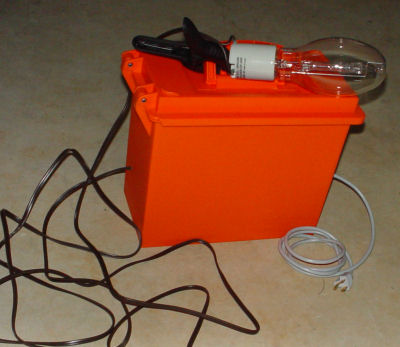
A sturdy container to house the ballast transformer. For a heavy duty metal container I recommend a mil surplus ōammo canö either 30 caliber size or 50 caliber size. Illustrated in this paper I am using a ōSportsmanÆs Dry Boxö made of heavy plastic and available in sporting goods departments of big department stores, or sporting goods or boating stores. This box is weather resistant and durable.
A 2 or 3 inch squeeze type clamp.
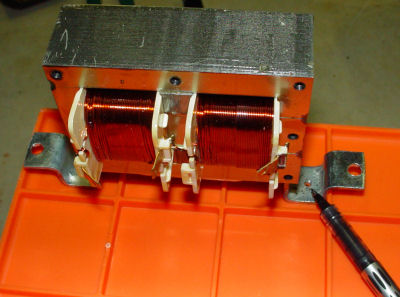
Begin by unpacking the light. Remove the lamp from the box and put it aside in a safe location.ĀThrow away the pie-pan looking shield and plastic lens. Remove the bolts that hold the socket in the housing. Remove the bolts that secure the transformer in the housing, and remove the screw that secures the photocell base in the housing. The result is a pile of stuff similar to this picture:
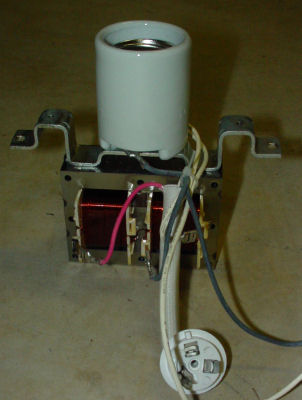
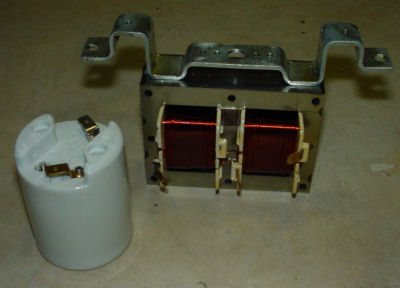
All that is needed at this point is the transformer and socket, as pictured:
Select a location for the power cord to enter the container. I typically want the power cord to enter on one side, and the cord to the lamp to be on the opposite side. Drill a small pilot hole at the selected location. Next select a drill bit that is a tiny bit smaller in diameter than the cord being used. If the cord can be put through the hole with a tight fit, it helps keep the unit weather resistant. No need for perfection though.
If the hole is drilled slightly larger than the diameter of the cord, some epoxy putty or silicone sealant can be used to seal the hole. Additionally this will prevent the cord from being pulled out and the connections inside from being stressed. Be sure to drill holes for the cords in locations that will leave enough room to work around the transformer after it is mounted.
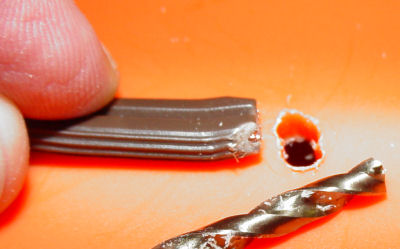
I shouldnÆt need to write this, but DO NOT PLUG THE CORD INTO AN OUTLET UNTIL COMPLETELY FINISHED WITH THE PROJECT. Next, select a location for the cord that goes to the lamp. This will be the indoor extension cord. Using wire cutters, cut off both the plug and receptacle ends of the cord. Select a drill bit slightly smaller than one of the insulated conductors of the cord. The cord is made of two insulated wires joined side by side. Drill two holes side by side so they end up touching in the middle. This can be a little difficult, and it may be easier to just drill one hole, and then ream it out sideways. The end result should be an oval hole the same dimensions as the cord. Alternately, one large hole could be drilled and then sealed as discussed above using silicone or epoxy. Again a tight fit is desired, both for weatherproofing and for durability. Once passed through the hole, separate a few inches of the cord and strip approximately ╝ inch of the ends.
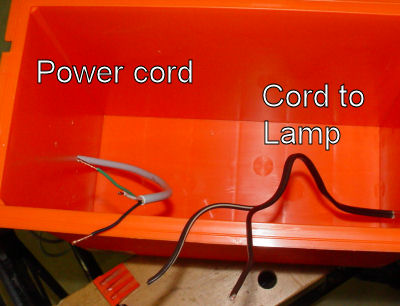
Refer to the following picture and notes for correct connections:
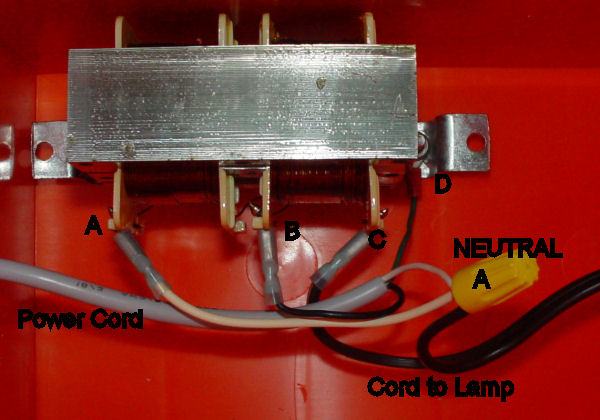
Various transformers may look slightly different, but the connections will be the same. The middle connection is always hot, one side is neutral, the other side is output to the lamp. No magic involved. Close and secure the lid of the container. DO NOT OPEN the box when the collecting light is plugged in!
At the other end of the cord going to the lamp, separate a couple inches of the conductors, and strip approximately ╝ inch of the ends. Crimp on a female spade connector to each. Connect the wires to the male spade connectors on the bottom of the mogul socket. The sockets will vary somewhat depending on the manufacturer, so yours may not be exactly as pictured.
Drill a small hole in the one of the jaws of the squeeze clamp. Using a screw through one of the mounting holes in the socket, connect the socket to the clamp. It should be similar to the photo below:
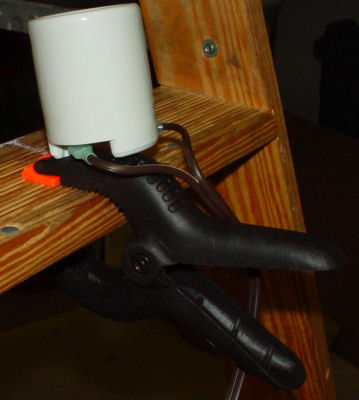

The clamp base for the socket can be used in many ways. ItÆs easy to clamp on a tripod, and could even be clamped onto a tree limb, fence post, or whatever presents itself. Builders can modify the rig as needed to fit their own unique circumstances.
Some notes on my choice of container:
The ōSportsmanÆs Boxö is rather larger than is absolutely needed. IÆve found the size to be beneficial though In a few areas. It leaves ōroom to growö if I want to add another transformer to make a dual MV rig, or add a ballast for a fluorescent tube (or both). Also the MV lamp can be padded and stored inside the box, however for electrical safety reasons I do not recommend this. I DO recommend that after being tested and verified, the lid of the box be secured with rivets to make it difficult to open.
I have also come to prefer it to metal ammo cans for several reasons. It will not corrode. It is made of electrically insulating material instead of conductive metal. It is much easier to drill than metal. For a negative, the cost ($7 to $8) is more than an ammo can.
An additional point is the bright orange color. The color makes it easy to see on the ground at the collecting site. ItÆs easy to trip and get hurt after being up all night collecting, perhaps after driving all day to get there.
If one chooses to use a metal container, it is critically important to attach the green ground wire of the power cord to the container. It can be attached to the transformer bracket or wherever it is convenient, as long as the green ground wire is electrically shorted to the container. If in the unlikely scenario that either the hot or neutral conductor should touch the metal container, having it grounded will trip the breaker on the generator or outlet being used. Without the ground attached, in the above situation, someone could receive a deadly shock.
Some notes on construction standards:
From a strict viewpoint, the least number of mechanical connections in any electrical system, the better. Instead of using crimped connectors and wire nuts, all connections could be soldered and insulated with heat shrink. Each indirect bond (crimp, wire nut, spade connector) creates a potential problem area for corrosion and looseness. BUT, weÆre not constructing a moon-rocket, itÆs a light bulb. For ōnormalö 60Hz household electricity these types of connections are fine as long as they are correctly made. Nearly all the connections in homes, other buildings, and power distribution systems are indirect bonds. All connections should be double checked for tightness and security.
Some notes on Mercury Vapor Lamps:
Mercury Vapor lamps are the oldest member of a family of devices called ōHigh Intensity Dischargeö lamps or HIDs. Simplified, instead of using a filament as do household incandescent lamps, they use a crystal tube filled with gaseous compounds that create a lot of light when an electrical current is passed through them. To achieve sufficient voltage to jump the arc through the tube, then to maintain sufficient current once the arc is struck, a transformer or ōballastö is needed for electrical regulation.
High and Low Pressure Sodium lamps, and Metal Halide lamps (among others) are also in the HID family. The other HIDs are more efficient than MVs, which is one reason MVs are falling out of favor with most folks other than insect collectorsģ Also it seems astronomers hate them, because they emit several frequencies of light which interfere with certain astronomical equipment. Several areas of the US near major observatories have ordinances in place to prohibit installation of new MV light fixtures outdoors.(see www.darksky.org)
Due to the relative inefficiency of MVs compared to other HIDs, there are rumors that MV production by the major lighting manufacturers will end sometime in the not-too-distant future. Every user should consider buying a stockpile of lamps and equipment if they intend to carry on their hobby or pass it down to upcoming generations. Most 175W lamps are rated at 24,000 hours of operating life, which is a LOT of collecting! Expect to have a lamp get broken once in a while though.
Only lamps with CLEAR envelopes are good for insect collecting. Do not buy ōfrostedö , ōcoatedö, or ōwhiteö MV lamps for collecting. The coated lamps are made with a phosphorus coating on the inside of the envelope. The chemical coating absorbs ultraviolet light, fluoresces and retransmits part of the energy as lower frequency visible light. The number of insects attracted to the coated lamps is miniscule compared to clear lamps.
Some very knowledgeable collectors have stated that different brands of lamps seem to attract different varieties of insects better than others. I donÆt have enough experience to comment. I can say I have had excellent results using 175W lamps made by GE and Phillips, as well as the generic Chinese lamps that come in the Regent box with the rest of the equipment.
Some notes on use in the field:
IÆve had very good success using collecting light rigs I have built. I have not seen lamp failure due to rain on these 175 Watt systems. IÆve run my lights through torrential monsoon downpours in Arizona with no ill effect.
Use common sense when setting up the rig for a night of collecting. If the lamp is clamped to a tree branch try to make sure it will not knock into anything if the wind comes up. If mounted on a tripod, secure the legs with rocks or stakes so it is not easily knocked over. Position the transformer box somewhere it will not easily be kicked or tripped over. I would recommend not letting the MV lamp touch the collecting sheet. Set it up so that even if the sheet breaks loose in a sudden gust of wind, it will not contact the lamp. I have a lot of pride in using the lights I have built myself, along with other collecting gear too.
For many of us, using equipment that is of high quality and built with our own hands is more satisfying than using the ōstore boughtö variety. The money saved compared to buying a commercial MV rig will pay for a LOT of gas to travel to collecting sites.
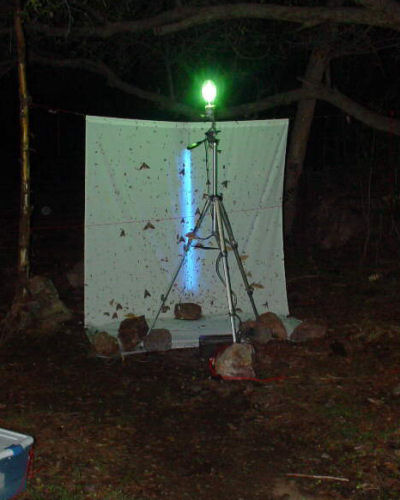
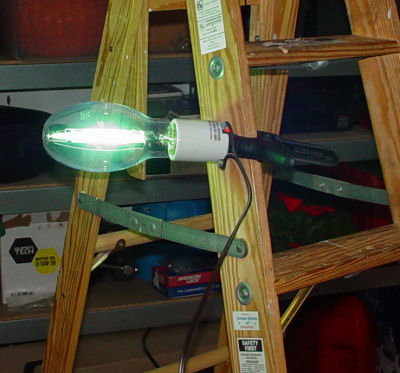
Home made 175W MV and 40W BL in use at Box Canyon, Arizona, August 2003.
The author can be contacted at jszymczyk@sw.rr.com .
Use your browser "Back" button to return to the previous page.