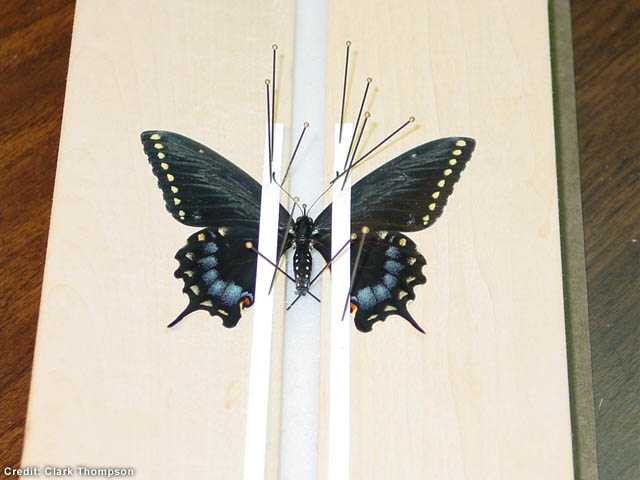
 Spreading Butterflies: Step 10. Final position. After the wings are in the desired configuration,
position the abdomen and antennae. Never let the abdomen dry in a drooped position. It is very difficult, if not
impossible, to correct this after the specimen has dried without re-relaxing it - and even then it may be difficult. I use
crossed pins to set the abdomen to be parallel with the vertical and horizontal axis of the board.
Folded tissue set in the groove under the abdomen at the beginning of the spreading process is a great way to keep
the abdomen elevated.
Spreading Butterflies: Step 10. Final position. After the wings are in the desired configuration,
position the abdomen and antennae. Never let the abdomen dry in a drooped position. It is very difficult, if not
impossible, to correct this after the specimen has dried without re-relaxing it - and even then it may be difficult. I use
crossed pins to set the abdomen to be parallel with the vertical and horizontal axis of the board.
Folded tissue set in the groove under the abdomen at the beginning of the spreading process is a great way to keep
the abdomen elevated.
I carefully set the
antennae in a natural 'V' configuration using insect pins. For extra protection, I sometimes position the antennae
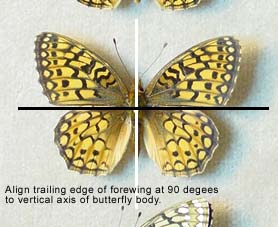
under the narrow strips before I start the pinning process. Note the position of the forewings in this picture. The
museum standard is for the trailing edge of the forewings to be a right angles (90 degrees) with the vertical axis of the
butterfly body. The position of the hindwing in relation to the forewing can vary. Some collectors like to set the
hindwings low so that more of the wing pattern can be seen. Others like it higher, which is a more natural position for a
living butterfly. In any case, to make an attractive symmetrical mount, make sure that the relative position between the
hindwing and the forewing is the same on both sides of the butterfly. Predrawn
lines, perpendicular to the groove, on the spreading board are of great worth when it comes to positioning the wings.
Photography tip: Study the nectaring and resting positions of butterflies under natural conditions. Look at the angle of
the wings, the curve of the proboscis, the positioning of the legs and feet. It is possible with a little deft pin work to
extend the proboscis and front legs into feeding/resting postions in the groove. The angle of the wings can be set
by adjusting your spreading board. A V-shaped board with empty and open space under the body will allow you to
work on the legs from underneath.
One the specimen has thoroughly dried, it can be pinned to outdoor foliage or flowers for a "natural closeup."
A little "touch-up" can easily mask the pin.
|